July 6, 2026 • Declan Merritt • 11 min reading time • Prices verified June 17, 2026
Camera Cage Fit Failures and How to Avoid Them Before You Buy
Camera Cage Fit Failures and How to Avoid Them Before You Buy
A camera cage is a metal frame — usually aluminum or carbon-reinforced alloy — that wraps around your camera body to protect it, add mounting points for accessories like microphones and monitors, and connect the whole setup to rods, handles, and support rigs. If it fits correctly, a good cage transforms a bare mirrorless or cinema body into a properly rigged production tool. If it doesn’t fit — if it presses against the wrong panel, blocks a door, or misaligns a critical thread — you’ve spent real money on a part that makes your camera harder to use, not easier. That’s the trap this guide is designed to help you avoid. We’ll walk through the most common cage-fit failures buyers run into, show you exactly where to check before you order, and give you the decision framework to match the right cage to your specific body and rig.
| EDITOR'S PICKNEEWER Aluminum Alloy Camera Ca… | Mid-tierCAMVATE Basic Camera Cage Rig w… | Budget pickPGYTECH Quick Release Plate & C… | |
|---|---|---|---|
| Material | Aluminum Alloy | — | — |
| Arca Type | ✓ | — | ✓ |
| Top Handle | ✓ | ✓ | — |
| Compatibility | Sony/Canon | Universal | Sony/Nikon/Fuji/Canon/DJI |
| Screw Thread | — | — | 1/4"-3/8" |
| Price | $77.99 | $39.00 | $34.95 |
| See on Amazon → | See on Amazon → | See on Amazon → |
The Fit Failure Nobody Warns You About: The SmallRig R6 Mark II / Mark III Problem
This is the highest-profile compatibility failure circulating in the mirrorless cinema community right now, and it’s a useful case study because the failure mode is invisible until the product arrives.
SmallRig built a well-regarded cage for the Canon EOS R6 Mark II — a precisely fitted half-cage that owners and reviewers consistently praised for its build quality and tight tolerances. When Canon released the R6 Mark III, a meaningful percentage of buyers assumed the cage would carry over. The product family name is nearly identical. The body dimensions are similar enough to create real ambiguity.
Multiple independent reviewers, including aggregated customer feedback documented in B&H Photo Video’s product Q&A threads, flag this explicitly: the SmallRig R6 Mark II cage physically contacts the cage frame at the memory card door location when mounted on the R6 Mark III body. The door cannot open fully. In practice, this means you cannot swap cards without removing the cage — which defeats much of the purpose of a fitted cage on a fast-paced shoot.
The mechanism matters: Canon revised the card door hinge geometry and door travel arc between generations. SmallRig’s cage was machined to the Mark II’s cutout dimensions. The clearance gap that worked on the older body became an interference fit on the newer one. This isn’t a quality control failure on SmallRig’s part — it’s a generational body revision that wasn’t reflected in updated compatibility documentation at the time buyers were making decisions.
The takeaway: Never assume a cage built for a Mark II, Version 1, or “first-gen” body will fit a Mark III or second-generation variant — even when the manufacturer hasn’t released a new cage SKU yet. Always verify the exact body revision in the compatibility spec before ordering.
Universal Cages vs. Camera-Specific Cages: Picking the Right Category
This is the fundamental fork in the road, and your choice here determines everything downstream.
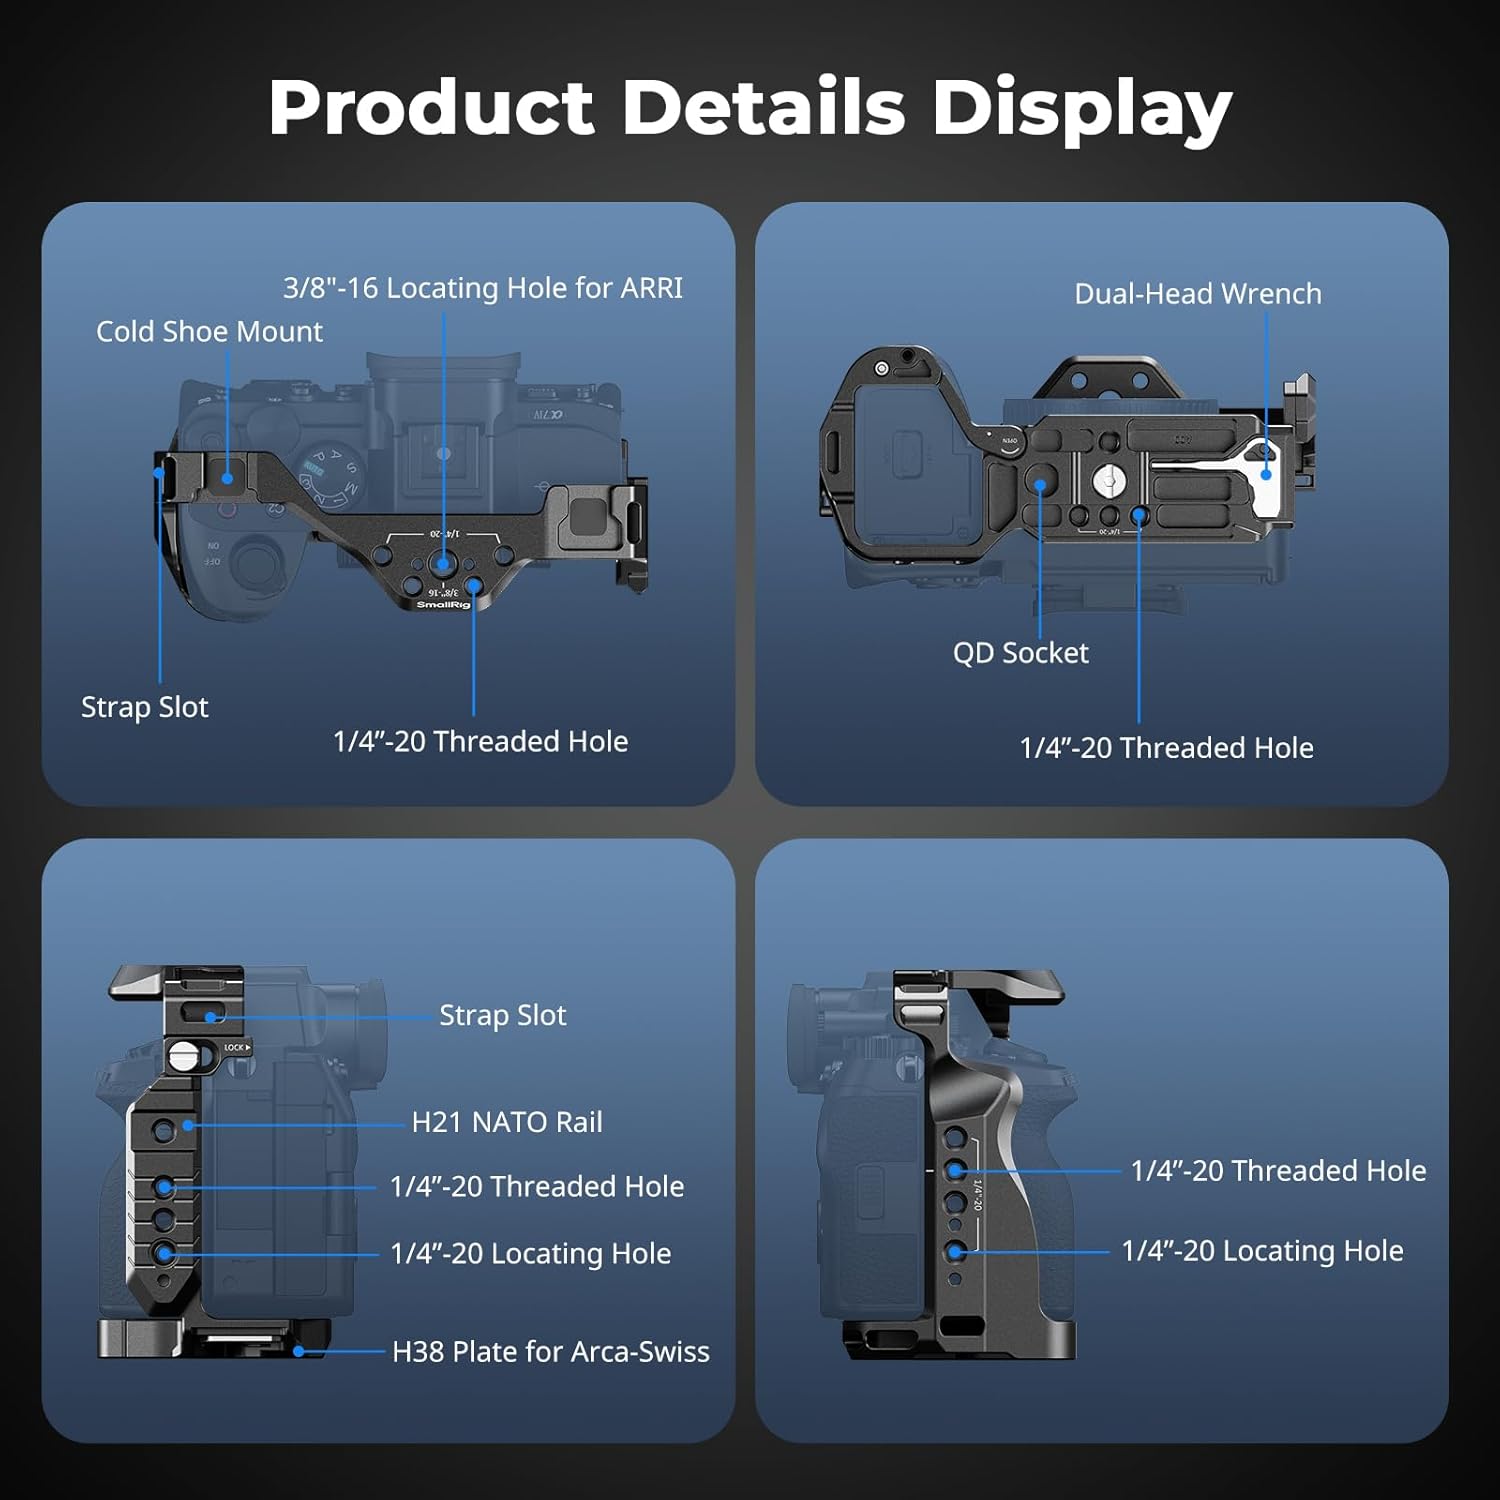
Camera-specific cages are machined or cast to match one body’s exact dimensions. Every cutout — battery door, card slot, ports, USB-C, HDMI, hot shoe — is designed around that camera’s chassis. When they fit, they fit beautifully. Owners of the SmallRig HawkLock cage for Sony A7-series bodies consistently describe the fit as “richer” and “stronger-feeling” than the bare body — a direct consequence of the metal frame making full contact with the camera’s contours and locking down via the 1/4”-20 base thread with zero play.
The downside: specificity. If you upgrade bodies mid-project or shoot with multiple bodies across different manufacturers, you’re buying a new cage for each platform.
Universal cages use a wider internal channel, adjustable clamping rails, or a base-plate-first design that accommodates a range of body widths and heights. They sacrifice door cutout precision for flexibility. As Cinema5D’s cage roundup notes, universal designs are a reasonable choice for shooters who rotate through rental bodies or who aren’t yet committed to a single camera platform — but they require you to manually verify that the cage’s generic cutouts clear your specific body’s doors before you rely on them on a paid shoot.
The decision rule: If you own one body and shoot on it consistently, a camera-specific cage will always outperform a universal on fit, feel, and long-term reliability. If you’re a DP who shoots on three different bodies in a given month, a universal cage with a quality base plate is the more rational choice — just budget extra time to do a physical check of every door and port on first mount.
Door and Port Clearance: The Pre-Buy Checklist
Whether you’re evaluating a specific or universal cage, run this checklist against the manufacturer’s published drawings before you order.
1. Battery door swing arc. Most fit failures happen here. The door doesn’t just open — it swings through an arc. A cutout that clears the door panel in closed position may still block the door at 90 or 120 degrees of travel. Look for spec sheets or CAD renders that show the door in open position, not just closed.
2. Card slot door position and depth. As the R6 Mark III case demonstrates, card doors are the second most common interference point. On dual-card bodies, verify both slots. On Sony A7-series bodies, the card door is on the right side and needs full travel clearance — something SmallRig’s HawkLock cages are specifically machined to provide, which is why reviewers consistently praise them.
3. USB-C and HDMI port access. For on-set monitoring and power delivery, you need both accessible without removing the cage. Verify the port cutout depth accommodates your specific cable head geometry — right-angle cables need more lateral clearance than straight connectors.
4. Hot shoe and top surface. If you’re mounting a mic or wireless TX to the camera’s native hot shoe, a half-cage or top-handle-only setup may leave it accessible. A full cage with a top rail may route over the hot shoe entirely, requiring you to use the cage’s cold shoe mount instead.
No Film School’s practical rigging guide makes a point worth repeating here: a cage that blocks one critical door will cost you more time on set than any rig convenience it provides. Verify before you buy.
Accessory Mounting Points: Where Cages Actually Differ
Once you’ve confirmed fit, the next decision layer is mounting real estate — how many attachment points the cage gives you and where they’re positioned.
Cold shoe count matters for run-and-gun. Owners of NEEWER cages consistently highlight the three cold shoe positions as a key differentiator in their setups. Three cold shoes let you simultaneously mount a shotgun mic, a small monitor, and a wireless receiver without any cold-shoe splitters or cheese plate additions. If you’re a one-person-band shooter doing documentary or event work, that extra mounting position is a genuine workflow advantage, not a marketing bullet point.
Modular design for minimal rigs. CAMVATE’s modular cage architecture earns specific praise from reviewers for its ability to run as a top-handle-only configuration — no side rails, no base plate, just the handle and the necessary attachment points. For shooters who want to stay light and handheld but still want a 1/4”-20 lattice of options for adding a SmallRig cold shoe arm or a monitor bracket, this design gives you a genuine middle path. You’re not forced into a full production cage if your current job doesn’t need one.
Rod length reality check. SmallRig base plate kits are a common entry point for rod-based rigging, and across aggregated buyer reviews, one complaint comes up with striking consistency: the included 8-inch rods are too short for most follow focus and matte box setups. The math is straightforward —
By the numbers: A typical matte box requires 100–120mm of rod ahead of the lens support. A standard follow focus adds another 60–80mm. An 8-inch (203mm) rod often leaves fewer than 20mm of clearance margin — not enough for most configurations. The practical solution owners land on: 12-inch (305mm) rods as the real working baseline.
If you’re building a rod-based rig from a SmallRig or comparable base plate kit, add 12-inch rods to your order before the kit ships. You’ll order them anyway.
Weight Penalty: Real Numbers, Real Tradeoffs
Cages do add weight, and on a long handheld day, that weight is felt. Here’s what published specs show across the common tiers:
| Cage type | Typical weight range |
|---|---|
| Lightweight aluminum half-cage | 100–180g |
| Full camera-specific cage (e.g., SmallRig HawkLock) | 180–280g |
| Full universal cage with base plate | 280–420g |
| Cinema-grade full cage (titanium or carbon) | 320–500g+ |
Across review aggregates at B&H Photo Video, the consistent owner feedback is that a well-fitted lightweight cage adds a barely perceptible weight increase but meaningfully improves the grip and balance feel of the handheld camera — the cage’s geometry distributes weight differently than a bare body. A universal cage with a heavy base plate, however, is noticeably heavier and will fatigue a handheld operator faster on extended takes.
Pro Video Coalition’s rigging coverage notes that the weight tradeoff is most acute for shooters transitioning from bare mirrorless bodies to rod-rigged setups — the cage is rarely the problem; it’s the cumulative weight of follow focus, matte box, and monitor that moves the system past comfortable handheld range.
Frequently Asked Questions
Will the SmallRig R6 Mark II cage fit the Canon R6 Mark III? No — and this is a documented compatibility failure, not speculation. Multiple independent reviewers confirm that the R6 Mark II cage frame physically contacts the memory card door on the R6 Mark III body, preventing the door from opening fully. Canon revised the card door geometry between generations. Use only cages explicitly listed as compatible with the R6 Mark III.
What is the difference between a universal cage and a camera-specific cage? A camera-specific cage is machined to one body’s exact dimensions, with cutouts positioned for that body’s exact port and door locations. A universal cage uses wider tolerances or adjustable rails to accommodate multiple body sizes, but cannot guarantee precise door clearance for any specific camera. Camera-specific cages fit better and feel more solid; universal cages are more flexible across multiple bodies.
How do I know if a cage will block my battery or memory card door? Check the manufacturer’s published dimensional drawings or CAD files for door clearance specs. Look specifically for open-door position diagrams, not just closed-body renders. If the spec sheet doesn’t show the door in open position, check the product’s Q&A section on B&H Photo Video — buyers frequently ask and answer exactly this question.
Can I run a CAMVATE cage with only the top handle and no side rails? Yes. CAMVATE’s modular design is specifically built to support a top-handle-only configuration. You get a solid 1/4”-20 and ARRI-style attachment point lattice without committing to the full cage footprint or weight. Reviewers consistently call this out as a practical advantage for shooters who want rigging flexibility without bulk.
Do these cages add noticeable weight to a handheld setup? A lightweight camera-specific cage adds roughly 150–250g — noticeable on a scale, but reported by most owners as improving rather than burdening the handheld feel, because the cage geometry changes how weight is distributed in your grip. Heavy universal cages with base plates (280–420g+) are more perceptible and can be fatiguing on long handheld days.
What rod length should I order if the included rods are too short? Order 12-inch (305mm) rods as your baseline working length. The 8-inch rods included with most SmallRig and comparable base plate kits are consistently flagged as too short for any setup that includes a follow focus or matte box. Owners report ordering 12-inch replacements almost immediately after unboxing. If you’re building a longer lens support run for a cinema lens, 15-inch or even 18-inch rods may be the right call.
The Decision Framework Before You Buy
If you’re evaluating a cage right now, here’s the if/then logic that saves you a return:
- If you shoot one camera body consistently → buy a camera-specific cage, verify the exact body revision in the SKU (Mark II vs. Mark III matters), and confirm door clearance via published CAD or B&H Q&A.
- If you rotate across multiple bodies or shoot rentals → a quality universal cage with a precision base plate is the pragmatic choice; run a manual door-clearance check on first mount.
- If you need maximum accessory mounting real estate for run-and-gun → prioritize cage designs with three or more cold shoe positions.
- If you want a minimal handheld rig without committing to a full cage → CAMVATE’s modular design supports a top-handle-only configuration that keeps you light and expandable.
- If you’re building a rod-based rig from a kit → add 12-inch rods to your order. You’ll need them.
The cage is the foundation of your entire accessory stack. Get the fit right before anything else attaches to it.